Most dining chairs are chosen for how they look. But according to award-winning interior architect Alyssa Anselmo, that’s the wrong starting point.
Well—technically—she’d probably never say anything is wrong. Alyssa isn’t one for design absolutes. But when it comes to picking the perfect seat, she believes something matters more than aesthetics: how it feels.
If you’re into perfectly baked, fresh-from-the-oven, homemade cookies (and let’s be honest, who isn’t?), you need more than a recipe: You need great cookie sheets. The material and construction matter, so we’ve spent years testing and re-testing cookie sheets. The one you use can make or break your favorite chocolate chip cookie, and you shouldn’t have to learn that the hard way. It’s worth noting that all of our favorites can go beyond baked goods—we use them for roasting all sorts of vegetables and meat, toasting nuts, cooling grains, making pizza, and more.
Things to Consider
What Is a Cookie Sheet?
Thin cookie sheets get hot too quickly. That leads to warped pans and burnt cookie bottoms.Serious Eats
A traditional cookie sheet is a thin, edgeless pan made from steel, aluminum, or a mixture of both. It’s good for one thing and one thing only: baking cookies. Cookies easily slide from the pan onto a cooling rack, and the lack of sides helps you maneuver a food turner around. Kitchen unitaskers aren’t bad—in fact, we recommend quite a few—but since baking sheets can bake cookies and roast vegetables and meat, we think they’re a much better option than traditional cookie sheets.
Rimmed sheet pans have one-inch walls and rolled edges on all sides. The height keeps food and hot fat contained, and the rolled edges serve two purposes. First, they make the pan easier to grip, especially when wearing pot holders or oven mitts. They also help prevent warping from extreme temperature changes. Still confused about the difference between cookie sheets and baking sheets? Check out this article for an in-depth look at them.
Nonstick vs. Regular Cookie Sheets
With regular baking sheets, you'll want to line them with parchment paper so cookies don't stick.Serious Eats / Vicky Wasik
Which is better: nonstick or regular cookie sheets? Here’s the top-line answer: Usually, regular ones.
We prefer cookie sheets without nonstick coatings because this coating wears away over time. Even with the most fastidious care, nonstick cookware (like skillets) will scratch and peel. Regular baking sheets are better long-term investments and can withstand higher oven temperatures.
But there are some times when nonstick baking sheets are nice to have. If you’re baking and don’t have parchment paper to use as a liner, a nonstick pan will ensure your cookies slide off easily. A rule of thumb for nonstick bakeware: Choose lighter-colored pans. Darker nonstick coating will cause food to cook faster, which can mess up a recipe—picture an almost-burnt oatmeal cookie with a still-raw inside.
How Big Is a Cookie Sheet?
A half baking sheet makes the perfect cookie sheet—it can comfortably hold six standard cookies (or more smaller ones!).Serious Eats / Amanda Suarez
The most common size cookie sheet is 18 by 13 inches, with one-inch sides. Quarter baking sheets are a step down from these; they measure 13 by nine inches. They’re ideal for baking a small batch of cookies—say you keep a stash of pre-rolled dough in your freezer and want to bake off just one or two.
Our Favorite Cookie Sheets
What we liked: This is one sturdy pan. The aluminum base heats up quickly and cooks evenly, while the steel edges provide extra stability and make it extremely durable. Still, it comes with a lifetime warranty—just in case. The lack of a nonstick coating means it is broiler-safe, and the chunky rolled sides are easy to grab, even with bulky oven mitts. It’s sold in a set of two, and you’ll want more.
What we didn’t like: Nothing to complain about. This is a great pan.
Key Specs
Materials: Aluminum, steel
Dimension: 17 x 12 inches
Edge Height: 1 inch
Warranty: Lifetime
Serious Eats / Fred Hardy
What we liked: In our review of nonstick cookie sheets, sticky ingredients slid right off this pan, including just-baked cookies and crispy Parmesan cheese. The rim is taller than most, which keeps splatters contained and makes it even easier to grab while hot.
What we didn’t like: It’s not broiler-safe and can only stand temperatures up to 450˚F. The bottom of this pan wasn’t the lightest-colored one we tested, which meant cookies browned a bit faster. But it was by no means the worst offender of all the nonstick pans.
Key Specs
Materials: Aluminized steel and nonstick coating
Dimension: 17.1 x 12.1 inches
Edge Height: 1 1/4 inch
Warranty: Lifetime
Serious Eats / Irvin Lin
What we liked: Everything we like about our overall top pick, this one has in miniature. It’s an ideal size for baking one or two cookies at a time. Its small footprint also makes it handy for prepping ingredients and roasting a batch of vegetables. You can buy lids that fit perfectly, so they double as baking vessels and cookie jars.
What we didn’t like: We can’t think of a thing!
Key Specs
Materials: Aluminum
Dimension: 12.1 x 8.8 inches
Edge Height: 1 inch
Warranty: Lifetime
Serious Eats / Vicky Wasik
FAQs
Is it “cookie sheet” or “cooking sheet”?
While both technically make sense, the term most commonly used is “cookie sheet.” Reminder: Cookie sheets have edgeless sides that help cookies slide off easily. We prefer baking sheets—they’re rimmed and can be used for baking and cooking.
How do you clean a cookie sheet?
Please don’t put them in the dishwasher, no matter what the manufacturer says. The high temperatures and cleaning solutions can degrade the finishes over time. To keep your pans in top shape, wash them with warm soapy water and a nonabrasive dish sponge. For stubborn stains, Bar Keepers Friend will work miracles.
When my publisher told me they wanted a new edition of the book, I decided to revise the book completely, from top to bottom. Ready for Dessert is a compilation of my favorite recipes, so I knew that I wanted to keep my signature Chocolate chip cookies, the Chocolate-cherry biscotti accented with black pepper, and classic Black & white cookies, along with everyone’s favorite, the Fresh ginger cake, as well as a tangy Lemon semifreddo, and the recipe for the Coconut layer cake I made for Alice Waters’ father on his birthday every year.
To sweeten the pot, I added brand-new recipes to Ready for Dessert, favorites culled from my kitchen in Paris, including Île flottante (inspired by the version I always order at a favorite local bistro), a very special Riz au lait (rice pudding) topped with crunchy, candied nuts and salted butter caramel sauce, buttery Palets Breton cookies, and my version of the iconic, and irresistible (truly!), Maple tart from Tapisserie in Paris, the pastry shop of the highly-regarded restaurant Septime, so you can make it at home.
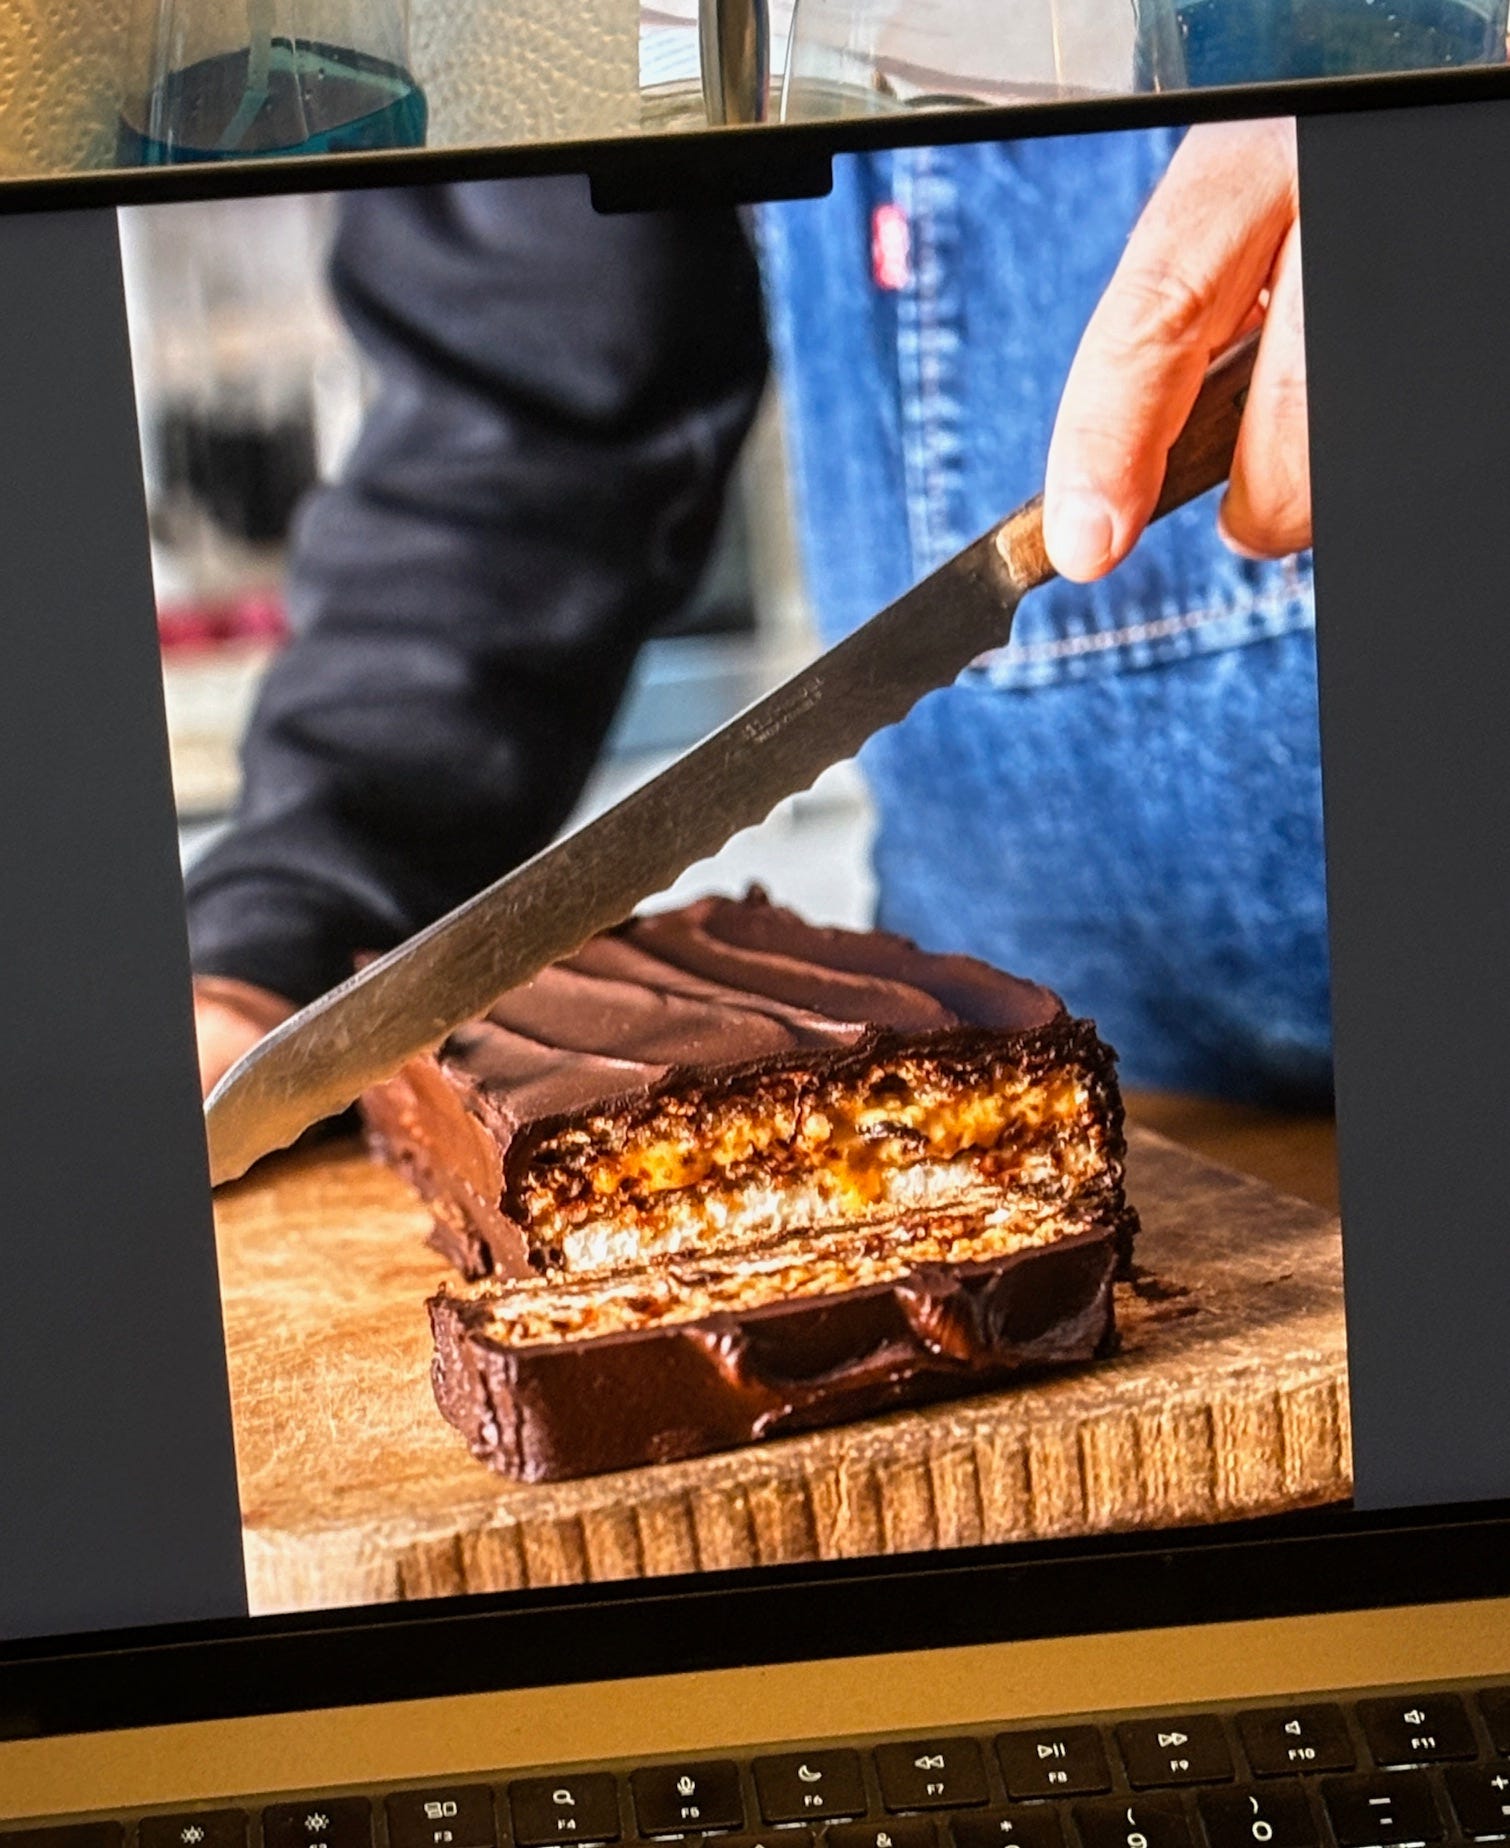
One of my favorite pictures (and recipes) from the new edition of Ready for Dessert is the Marjolaine cake. We made several of these cakes for the photo shoot and gave leftovers to the local butcher shop – and now I’m their favorite customer.
Award-winning photographer Ed Anderson, who photographed my books, My Paris Kitchen, Drinking French, and The Perfect Scoop, returned to Paris to shoot the pictures for the book, in my kitchen and backyard, as well as out-and-about in the city. Another bonus was that I got to work with two of my favorite food stylists, Elisabet der Nederlanden and George Dolese. We had a blast shopping in Paris for ingredients, and making the recipes in my kitchen, then eating them as well.
When the food stylists end up devouring your recipes during a photo shoot, that’s the highest compliment a cookbook author can have. They bake and cook food all day long, so are picky about what they eat. (And boy, did they eat!) I also invited friends to come by and join us, so you’ll find guests shots in the book as well.
The all-new edition of Ready for Dessert is now available at your local independent bookseller and online.
Below are some bookstores and online retailers where you can order the book:
Serious Eats editors know a thing or two about knives. Whether they’ve worked in restaurant settings or have tested kitchen gear for years, they all have favorites that they turn to every day for tasks big and small. We asked our fellow editors about the knives they use in their home kitchens, and their answers were, unsurprisingly, detailed and opinionated. We recommend you take inspiration from their blade collections, whether you’re on the lookout for a new nakiri knife or petty knife. Their picks span chef’s knives, paring knives, bread knives, and much more.
Mercer Culinary Genesis 8-Inch Chef's Knife
Amazon
I’ve likely spent more time using, testing, and writing about knives than most people on Earth (wild, right?), and I have many knives I love. But if I had to call out just one, it might be this very affordable chef's knife from Mercer. The quality-to-price ratio is so good on this thing that I have yet to find another chef's knife that rivals it. And I can back that up with years of use: I've owned this knife since 2018 and it’s the go-to knife in my home kitchen for all our cooking. It feels good in my hand, I'm able to put a good fresh edge on it whenever it needs it, and it shows no signs of any wear and tear. Honestly, Mercer should get a lot more recognition in the cooking world; they make a quality product and charge a very reasonable price for it. — Daniel Gritzer, editorial director
Serious Eats
Mercer Culinary Renaissance 8-Inch Chef's Knife
Amazon
My go-to is my Mercer Renaissance 8-inch chef's knife. I've had this knife since culinary school and it can handle all the daily wear and tear that I throw its way. — Leah Colins, senior culinary editor
Misen 5.5-Inch Utility Knife
Amazon
This petty knife didn't win our review because of the hefty, heavy handle—but that's actually what I love about it. It's well-balanced in my hand, which makes me feel more confident using it. I use it just as often as my 8-inch chef's knife. — Rochelle Bilow, editor
Serious Eats
Misono UX10 Chef's Knife
Amazon
I love this chef's knife so much that I wrote a whole love letter to it. It's the perfect length, super sharp, and glides through every prep task like a kite on a breeze—which is to say, lightly and with ease. — Grace Kelly, editor
Serious Eats
Tojiro Japan Bread Knife
Amazon
This is simply the best bread knife. Its slim blade smoothly slices through crusty boules, soft sandwich bread, and juicy tomatoes. The blade is flexible, too, so I even use it to peel butternut squash. It's been our top pick for years, and I can't recommend it enough. — Riddley Gemperlein-Schirm, associate editorial director
Serious Eats
Victorinox Swiss Classic 4-Inch Spear Tip
Amazon
Is it silly to recommend a tiny serrated knife? This serrated paring knife makes peeling and slicing small produce a breeze. It's especially great for ripe, juicy cherry or plum tomatoes! — Genevieve Yam, culinary editor
Serious Eats
Global 7-Inch Vegetable Knife
Amazon
Over the years, I’ve received some pretty fancy knives—but expensive doesn’t always mean better. And if your hands are on the smaller side (like mine are), those large chef’s knives designed with men in mind just won’t cut it. That’s why I love my Global nakiri knife. I use it almost every day. It’s lightweight, perfectly balanced, and forged from a single piece of metal, so the handle and blade are one seamless unit. — Kelli Solomon, senior social media editor
Serious Eats
Shun Nakiri Knife
Amazon
This is my first and only nakiri knife. My partner gifted it to me years ago, yet it’s still just as sharp as the day I got it. As a vegetarian, I’m always slicing or chopping vegetables, and this knife’s squared-off tip helps me glide through thick sweet potatoes or sinewy stalks of celery. — An Uong, writer
Opinel No.08 Stainless Steel Folding Knife
Amazon
As the weather warms up, I already have my mind set on beach days and camping trips. For both types of adventures, I always pack my Opinel folding knife. It folds up to the length of an iPhone and has a sharp blade for conveniently slicing cheese, fruit, and other snacks on the go. — An
I did not understand the value and appeal of a pressure cooker until I became a mother. Time has become especially precious, and I find myself frantically rushing around during my son’s brief naps to meal-prep as much as I can. Stressed and short on time, I’ve quickly adapted all my go-to recipes—such as beef noodle soup and congee—for the Instant Pot, so they can be made as quickly as possible. One of the first recipes I adapted for the pressure cooker was lu rou fan (Taiwanese braised minced pork belly), a comforting and deeply flavorful dish that has long been a fixture in my kitchen.
The first iteration of this recipe is in my cookbook Made in Taiwan: Recipes and Stories From the Island Nation. I learned to make the dish from Lin Tai-Yu, the third-generation owner of Lin Family Braised Pork Over Rice in the Taiwanese city of Tainan. Lin, who goes by Gloj, spends his days slowly simmering hand-diced pork in a sweet and savory concoction of soy sauce, fried shallots, garlic, rice wine, and sugar. For the silkiest sauce, he recommends using the fattiest slab of pork belly you can find, dicing it finely, and slowly simmering it over the stove for hours.
Before I had my son, I took his advice to heart. I made time to dice pork belly into perfect, tiny squares, render out the fat in a wok, and pour in the soy sauce and aromatics. I’d then simmer it all with the lid slightly ajar and let the sauce slowly reduce over several hours until it became thick, treacly, and perfectly balanced between savory and sweet. That approach meant I could control the rate of evaporation, and ensured the flavors of the dish could concentrate slowly and steadily without losing too much moisture too quickly. Since my son’s arrival, though, I’ve had to bid farewell to the days of idly tending to a wok—which is where the Instant Pot comes in.
The biggest benefit of using an Instant Pot is that it’s hands-off and shaves off hours of cooking time. There’s no need to hover over the stove, stirring and adjusting to make sure the pork doesn’t stick or burn. Once you’ve used the sauté function to sear the pork and bloom the aromatics, you can seal the cooker and rest assured that dinner will be ready in a little over an hour. And while it cooks, you can prepare your rice and any side dishes you’d like to serve the pork with. Here’s how to make it.
Serious Eats / Qi Ai
Adapting a Taiwanese Classic for the Pressure Cooker
There’s a reason why seasoned vendors—those who have spent decades perfecting their craft—swear by the slow simmer of a stovetop braise. The pressure cooker, while efficient, changes the alchemy of the dish because there is no constant evaporation and the flavors develop on a much speedier timeline. The sauce doesn’t get as thick, and while the aromatics are briefly bloomed at the start, they don’t continue to caramelize and deepen in flavor the way they would over a low, open flame.
With the stovetop version, I’m also able to taste and adjust as I go along. With a pressure cooker, there’s not much (if any) room to improvise on the fly. That said, if you keep the following tips in mind, you’ll be able to make a braise that’s practically as good as the stovetop version. Just remember that pressure cookers can vary, so you may need to reduce the sauce a bit more and season to taste at the end.
The Size of the Pork Matters
Dicing pork belly into small, uniform pieces allows the meat to cook evenly and maximizes the meat’s surface area, allowing it to absorb as much of the sauce as possible. As the meat cooks, the fat renders, giving the braise a soft, supple texture. Unevenly cut pork won’t break down as evenly, resulting in a chunkier sauce that isn’t as velvety.
A sharp knife is essential for cutting the pork well. For ease, I like to freeze the pork belly for about an hour so it firms up but remains pliable, making it much easier to dice. If you live near a friendly butcher like I do, however, they might be happy to dice the meat for you and vacuum seal it in your preferred portion sizes. Keep bags of diced pork belly in your freezer at all times, and you’ll be able to make lu rou fan whenever you want.
Getting the Braising Sauce Right
The braising liquid is just as important as the pork in this dish. Sugar and soy sauce are the main ingredients, and though soy paste—a thick Taiwanese soy sauce that has a hit of licorice—is traditional, I prefer oyster sauce for its brininess. Rice wine brings depth and a hint of sweetness, and a generous half cup of fried shallots provides rich savory notes with a hint of caramel.
Since everything is cooked in a pressure cooker, you'll need less liquid than a stovetop braise that reduces slowly over several hours. You want just enough liquid to fully cover the pork so that it cooks thoroughly.
The pressure cooker takes on the heavy lifting, effortlessly combining the rendered fat, succulent pork belly, and aromatic braising liquid into a harmonious dish. This Instant Pot version may not be the most traditional way to make this dish, but it’s just as delicious—and ready in half the time.
Serious Eats / Qi Ai
In an electric multicooker (such as an Instant Pot) set to the sauté function, cook pork belly, stirring often, until opaque and some of its fat has rendered, about 5 minutes. Add the garlic and cook, stirring to combine, until fragrant, about 1 minute.
Serious Eats / Qi Ai
Add water, fried shallots, soy sauce, sugar, oyster sauce, and rice wine. Seal cooker, bring to high pressure, and cook for 40 minutes. When done, let cooker depressurize naturally, 30 to 45 minutes.
Serious Eats / Qi Ai
Open the cooker and mix well. If you’d like the braising liquid to be thicker, set pressure cooker to sauté function and simmer sauce until it’s thick, treacly, and slightly reduced, about 15 minutes. Serve over cooked white rice.
Serious Eats / Qi Ai
Special Equipment
Electric multi-cooker, such as an Instant Pot
Notes
I’ve tested this recipe dozens of times, both on the stovetop and in a pressure cooker, and found that the ideal soy sauce-to-water ratio varies depending on the brand of soy sauce used and how salty you like your food. For convenience, I typically reach for Kikkoman, but if you're using a low-sodium soy sauce or one with added sugar, you’ll need to season to taste at the end. This dish is more of an art than an exact science, so don’t be afraid to tweak things.
Make-Ahead and Storage
Leftover lu rou fan stores beautifully in the fridge or freezer. Refrigerate in an airtight container for up to 3 days or freeze for up to 3 months. Freeze in individual portions and thaw in the refrigerator. To reheat, bring to a simmer over medium heat or microwave until warmed through.
Though shakshuka originated in North Africa, today it’s popular throughout the Middle East (particularly in Israel) and elsewhere in the world, including in the United States, where it's a fixture on brunch menus. While this one-pan dish traditionally features eggs gently poached in a heavily spiced tomato sauce, it’s infinitely riffable. There are versions loaded with roasted veggies or studded with chorizo or chickpeas, but my favorite variation—especially during the spring—is green shakshuka.
Over the past decade or so, green shakshuka has become a brunch staple throughout the U.S. A vibrant, green sauce loaded with fresh herbs, spinach, and spices is the perfect foil for rich, runny eggs. Served with some good crusty bread for scooping, it’s a filling meal that’s just as great on a busy weeknight as it is for a leisurely Sunday brunch.
In our recipe below, our Birmingham, Alabama–based test kitchen colleague Tricia Manzanero Stuedeman has developed a shakshuka with an impressive green hue. The sauce is packed with fresh cilantro, parsley, spinach, and an array of warm spices. The sauce components are blended and simmered before the eggs are nestled in and perfectly poached, then garnished with avocado, pickled onions, feta, and fresh herbs.
Ensuring a Vibrant Green Sauce
The key to great green shakshuka is nailing the sauce. The sauce should be a mostly homogenous purée that’s thick enough to cradle and poach the raw eggs. It should also remain vibrantly green—not muddy army-green—once cooked for the most appetizing presentation. In developing this recipe, Tricia used a few culinary tricks to ensure a bright sauce with the right silky texture. First, she found that blanching the herbs and spinach with a small amount of baking soda helps weaken the vegetable cell walls, quickly softening them for easy blending while maintaining their bright green color.
Tricia also blanches and blends most of the spinach with vegetable stock, cream, and aromatics to create a velvety, pourable sauce, while reserving a couple cups of the raw spinach to wilt down into the sauce. This creates a sauce that’s creamy and mostly smooth, but with a welcome slightly chunky texture that’s perfect for scooping with good crusty bread.
How to Perfect the Eggs in Green Shakshuka
The trickiest part of most shakshuka recipes is getting the eggs cooked so the yolks are still jammy when the egg whites are set. While some recipes require an oven, we find sticking to a streamlined stovetop method easier. All you need is to gently poach the eggs directly in the sauce until just set. This can be easier said than done, as making shallow indentations in the sauce and cracking each individual egg into the wells can take some time, causing the first egg to overcook by the time the last egg is cracked in. To avoid this and to help the eggs cook at a more even rate, remove the skillet from the burner to eliminate the urgency of adding the eggs over heat.
We also recommend cracking each egg into a small bowl before carefully adding it to the sauce so you can remove any rogue eggshell pieces before adding the eggs to the skillet. It’s also easier to neatly slip each egg into the sauce from a bowl, which helps keep the eggs from spreading too much as they cook.
Taking a cue from Kenji’s shakshuka recipe, Tricia incorporates the technique of spooning a little bit of the sauce around the whites of the eggs to help them set just a touch faster than the yolks. Once the skillet is covered and returned to the heat with the eggs, monitor closely and cook until the egg whites are just set and the yolks still golden and soft—perfect for dipping bread into.
In an 8-quart or larger pot or Dutch oven, bring water, baking soda, and 2 tablespoons salt to a boil over medium-high heat. Place a large bowl of ice water next to stovetop.
Serious Eats / Robby Lozano
Add cilantro and parsley to a fine-mesh strainer; dip strainer with herbs into water and cook, stirring constantly to ensure herbs are submerged, until herbs are bright green, about 10 seconds. Lift strainer and herbs out and transfer mixture in strainer to prepared ice bath and let sit until herbs are cold, 5 minutes. Drain and pat herbs dry, but do not squeeze (it should yield about 1/2 cup). Leave pot of water on stovetop on low heat.
Serious Eats / Robby Lozano
To blender jar, add herbs, chile, 1/2 cup oil, 2 teaspoons garlic, 1 teaspoon salt, 1 teaspoon cumin, and 1/2 teaspoon coriander. Blend on high, scraping down sides of blender jar as needed, until smooth, about 1 minute. Transfer herb purée to a small bowl; set aside. (Do not clean blender.)
Serious Eats / Robby Lozano
Return blanching water to a boil over medium-high heat. Add 8 cups (8 ounces; 226 g) spinach to boiling water; cook, stirring constantly, until bright green and wilted, about 10 seconds. In now-empty fine-mesh strainer, drain spinach, pressing out excess liquid with a silicone spatula (it should yield about 2/3 cup cooked leaves). Transfer spinach to blender; add broth and cream, and process until smooth, about 30 seconds to 1 minute. Set aside.
Serious Eats / Robby Lozano
In a large skillet, heat remaining 2 tablespoons oil over medium heat until shimmering. Add celery; cover and cook, stirring often, until starting to soften, about 3 minutes. Add leek and bell pepper; cover and cook, stirring often, until vegetables are crisp-tender, 5 to 8 minutes.
Serious Eats / Robby Lozano
Uncover and stir in remaining fresh spinach and remaining 1 teaspoon garlic. Cook, stirring constantly, until spinach is wilted and garlic is fragrant, 1 to 2 minutes.
Serious Eats / Robby Lozano
Stir in spinach purée, 4 tablespoons of prepared herb purée, remaining 1 teaspoon salt, remaining 1/2 teaspoon cumin, and remaining 1/4 teaspoon coriander; cook over medium heat, stirring often, until simmering, 2 to 3 minutes.
Serious Eats / Robby Lozano
Remove skillet from heat. In a small bowl, crack 1 egg. Using a rubber spatula or large spoon, clear a rough 2-inch diameter well in sauce. Immediately pour in the cracked egg. (The well will hold yolk in place but may not fully contain egg white; this is ok.) Gently spoon a little sauce over edges of egg white to help contain it. Repeat with remaining eggs, evenly spacing them around the skillet. Cover, return to heat, and cook until egg whites are set but yolks are still jiggly, 3 to 6 minutes, or until desired doneness.
Serious Eats / Robby Lozano
Uncover and top with feta, avocado, and pickled red onion. Sprinkle with cilantro and parsley. Stir lemon zest and juice into reserved cilantro mixture. Serve immediately, drizzling cilantro mixture on each portion. Serve bread on the side.
Serious Eats / Robby Lozano
Special Equipment
Large pot, blender, fine-mesh strainer, large skillet, silicone spatula
Make-Ahead and Storage
The final dish is best served immediately, but the sauce can be cooked through step 6, cooled, and refrigerated for up to 1 day. To serve, gently reheat the sauce over medium heat in a large skillet until simmering, then remove from heat and proceed with steps 7 and 8 of the recipe.

 Login
Login