Normal view

The better way to make tomato toast

1 August 2026 at 18:00

The mind keeps a strange little pantry of its own.

It shelves a photograph you paused over, a dish you ate three summers ago, a flavor combination you praised enthusiastically in public and then apparently continued discussing with yourself in private. Later, it sends an idea forward as though it has arrived whole.

Mine was miso-butter tomato toast.

A friend had recently posted photographs from Barcelona, including several enviable angles of pan con tomate. In one, it sat on a tiny plate beside a chilled vermouth cocktail garnished with a pearl onion on a spear. In another, it occupied an outdoor café table next to an exceptionally good pair of cat-eye sunglasses. I wanted the toast, the cocktail, the sunglasses and, presumably, whatever version of myself knew how to arrange all three so casually.

I had also recently waxed poetic about compound butter during a live discussion on summer entertaining. And after several weeks of 90-degree days, I had become devoted to grating tomatoes, an activity especially suited to weather in which chewing can seem like an unreasonable demand.

The name arrived before the instructions did. I knew it would involve sourdough. I knew the bread would be toasted in the oven, where its entire surface could become evenly crisp rather than merely acquire a few handsome skillet stripes. I knew I wanted unsalted butter and mild white miso. And I knew the finished thing would require some crunch.

It had, in other words, the certainty of a craving and the vagueness of a dream.

Toast is forgiving of this kind of thinking. It is the food of pantry rummagers and refrigerator foragers, and it exists on a curious emotional spectrum. One person says, with defeat, “All I managed today was beans on toast.” Another announces, with delight, “I made these incredible marinated white beans and put them on toast.” I am firmly in the latter camp. Toast is what happens when three unrelated things in the refrigerator agree to become lunch.


Want more great food writing and recipes? Sign up for Salon’s free food newsletter, The Bite.


This particular toast only looked improvised. Beneath its casual, slightly rumpled appearance was a specific bit of flavor logic: salt, fat, sweetness, acidity, glutamates upon glutamates.

There is a quiet kitchen principle I return to often: What wants to hold hands?

Spend enough time cooking — or leafing through cookbooks in bed — and you notice certain ingredients keep reaching for one another. Tomato already knows butter from ghee-rich curries, grilled cheese dipped in tomato soup and Marcella Hazan’s famously spare sauce. Miso and butter are just as comfortable together, whether in mashed potatoes or chocolate-chip cookies. The combination needed little persuasion. I only had to decide what shape it would take.

I considered whipping the miso into cold butter, making a compound butter to scrape over oven-hot sourdough before adding tomato slices and crystalline hunks of salt. But I wanted the miso butter to seep into the bread, not merely sit on top of it. I considered basting the tomatoes in butter and stewing them down with miso until soft and glossy. That version sounds wonderful, but it belongs to the first day the temperature slips below 70 degrees.

This was summer. The tomato needed to remain itself.

I melted the butter and miso together until fragrant and faintly nutty, then brushed it over sourdough and baked the slices until deeply golden. I grated a ripe tomato into a bowl, an operation I find disproportionately satisfying. When the skin has collapsed into your palm like a deflated balloon, you lift the box grater and discover an almost implausible amount of ruby pulp underneath it. Apparently, when it comes to shreds and zest, I possess the object permanence of a baby. Every time, the reveal delights me.

I seasoned the tomato with salt and a little garlic powder, which supplied savory warmth without the acridity fresh garlic can bring. I spooned it over the hot toast and finished it with scallions, sesame seeds, black pepper and olive oil.

I had my notebook open beside me, ready to catalogue the toast’s faults. Recipe development has trained me to distrust a dish that works on the first try; it is like meeting someone wonderful on a first date and spending the evening scanning for red flags. I have to be missing something, right?

Perhaps it needed acid. White balsamic, maybe, or a splash of the regular kind. Then I tasted it.

I took another bite before picking up my pen.

“This is a good toast,” I wrote.

Another bite.

“I’m glad I didn’t add vinegar.”

Miso-Butter Tomato Toast 
Yields
2 servings
Prep Time
10 minutes
Cook Time
15 minutes

Ingredients

  • 1 medium ripe tomato
  • ¼ teaspoon kosher salt, plus more for finishing
  • ⅛ teaspoon garlic powder
  • 1 tablespoon unsalted butter
  • 1 ½ teaspoons white miso
  • 2 thick slices sourdough bread
  • 2 teaspoons extra-virgin olive oil, plus more as desired
  • 2 teaspoons thinly sliced scallions
  • ½ teaspoon sesame seeds
  • Freshly ground black pepper


Directions

  1. Heat the oven to 350 degrees. Line a small sheet pan with parchment paper.
  2. Cut the tomato in half. Holding one half by its skin, grate the cut side against the large holes of a box grater set over a bowl. Continue until only the flattened skin remains; discard the skin and repeat with the remaining half. Season the tomato pulp with the salt and garlic powder, then set aside.
  3. In a small skillet or saucepan, melt the butter over medium-low heat. Add the miso and stir until smooth. Continue cooking for 30 seconds to 1 minute, until the mixture smells nutty and begins to deepen slightly in color. Remove from the heat before the miso darkens too much.
  4. Brush the miso butter generously over both sides of the sourdough. Arrange the bread on the prepared pan and bake until golden and crisp, 12 to 15 minutes, flipping halfway through.
  5. Transfer the toast to a plate. Spoon the grated tomato over the top, leaving behind any excess liquid if the tomato is especially juicy. Drizzle with the olive oil and finish with the scallions, sesame seeds, black pepper and another small pinch of salt. Serve immediately.


The post The better way to make tomato toast appeared first on Salon.com.

Energy Balls

25 January 2026 at 00:20
best energy balls recipe

These energy balls are lifesavers! When you’re hungry in between meals, running out the door without breakfast, or craving a wholesome little treat, these energy balls will come to the rescue. They’re the perfect healthy grab-and-go snack.

This recipe is made with oats, honey, nut butter, and toasted nuts and seeds, though it’s endlessly adaptable to suit your preferences. I designed it to offer sustained energy from the whole grains and nuts. One ball is just sweet enough to taste like a treat, and offers a healthy dose of protein and fiber.

This recipe was inspired by my husband’s mom’s interpretation of my no-bake granola bars. She always has a batch in the fridge for her grandkids, and they’ve become a staple in our house, too. I crumbled one over my yogurt just this morning, and they’ve kept my energy level up through this postpartum phase. They’re a perfect homemade gift for anyone who’s in a busy season of life, that’s for sure.

Continue to the recipe...

The post Energy Balls appeared first on Cookie and Kate.

Orange-Glazed Polenta Cake

By: David
9 January 2026 at 16:28

Orange-glazed polenta cake

Apparently I’m not the only one who loves polenta cake. The Italians like it so much that it’s called Amor Polenta. Which means “Polenta Love.”

Well, at least that’s what I thought it meant, because amour in French means “love.” And I assumed that it was the same in Italian. (Another reason for finally getting on that life-long ambition to live in Italy and learn Italian.) But for now, checking in an Italian dictionary, I found out that “amor” means “sake.” (As in, for the purpose of.) So I’m not sure how it got its name, but this cake makes a pretty good argument for the sake of whisking polenta into a cake.

Orange-glazed polenta cake

I’m one of those people who is completely crazy for anything with cornmeal, from corn bread to even a kind of kooky polenta ice cream that I’m sure no one else has ever made, because I used a completely obscure polenta that very, very few people can get their hands on. But I felt compelled to make it, for the sake of using up a little bag of that polenta that I had.

Orange-glazed polenta cake

Fortunately, polenta is available just about anywhere. I like to buy stone-ground polenta, which has a crunchier flavor. But you could use instant polenta for this cake, normally something I avoid. But I found myself with a bag of it and was looking for ways to use it up. And here’s where the rest of it landed.

Like many Italian cakes, which are unlike American cakes, this is not a buttery bomb of richness. True, there is butter and a few eggs in there. But the great flavor comes from ground almonds, which tend to make the cake much moister the following day as the nut oils soak the crumb, which is one of those baking terms (unlike amor) that pretty much seems to be what it is talking about. The polenta adds a bit of a savory quality to desserts, which draws me to use it a lot when baking.

Orange-glazed polenta cake

This cake is a great snacking cake and I tend to walk around my apartment several times during the day, somehow landing frequently near the cake, where a serrated knife just happens to be stationed alongside. Ready and waiting to lop a slice off.

Orange-glazed polenta cake

In addition to a collection of polentas, I found myself with a collection of eaux-de-vie on hand. Some were gifts, others were picked up on my travels. A few are anise-based, which pair nicely with polenta, and chocolate. I have a ginger one that is great when summer fruits are in season, like peaches, nectarines, and apricots. And the long bottle in the front right, the eau-de-vie of lees that I got in Switzerland, after I found out how good raisins in lie (eau-de-vie made from leftover grape yeast, and other stuff that falls to the bottom of wine vats post fermentation) was, after gorging on cauldrons of fondue.

As astute readers can see from the fill line of the bottle, that project never came to fruition. (I’m too busy trying organize my polentas and eaux-de-vie. And plotting a way to live in both Italy, and France.) But I did add a few shots of orange liqueur (not shown), which gave it a little boost of flavor. Not enough to be perceptible. But like that bag of instant polenta I’ve had for a few months, I was always conscious that it was there. You can use any kind of liqueur that you want – maraschino, limoncello, absinthe, kirsch, or even anise liqueur.

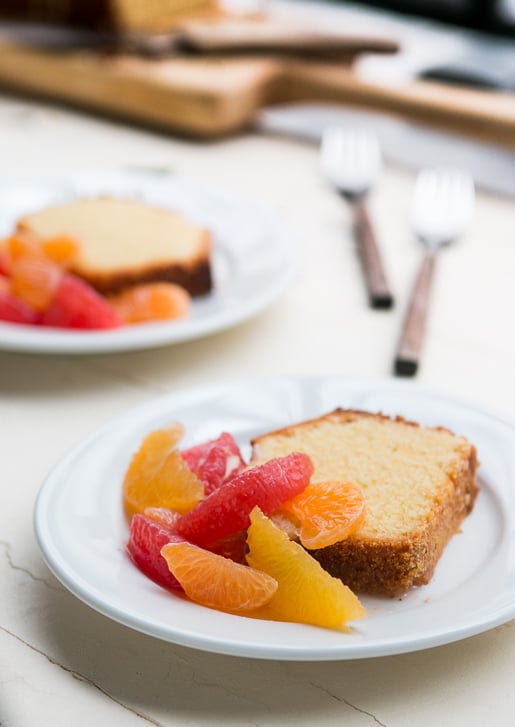
As much as I like this as a snacking cake, it can be dressed up with a fruit compote. I sectioned some tangerines, navel oranges, and pink grapefruits, drizzled a little honey over them, and served them alongside the cake. I had planned to spoon some warm sabayon over the cake and fruit, but decided that I had too many other things to do. Namely, get cracking on using some of those bottles of liqueur that I’ve been hoarding.

Polenta cake recipe

Print

Orange-Glazed Polenta Cake

For this cake, using fine-ground polenta or instant polenta will result in the smoothest texture, although whatever is available will work. I’ve made it with coarse polenta too, and enjoy the crunch. Almond flour is available at specialty stores, Trader Joe’s, and online. If you can’t find it, grind 7 1/2 ounces (215 grams) sliced blanched almonds in a food processor with the flour until the almonds are pulverized. Although cakes like this don’t always need adornment, I did glaze it with a dribbly orange glaze that firms up and gives the top a citrus-scented fruity crunch. For those wanting to skip the liqueur in the cake, you can leave it out and increase the almond extract to 1 1/4 teaspoon. For the glaze, you replace the liqueur with orange juice.

Ingredients

For the cake

  • 8 ounces (225g) unsalted butter cubed, at room temperature
  • scant 1 cup (180g) sugar
  • zest of 1 lemon
  • 3 large eggs at room temperature
  • 2 tablespoons liqueur or eau-de-vie such as orange liqueur (Grand Marnier or Cointreau), kirsch or grappa
  • 3/4 teaspoon pure almond extract
  • 3/4 cup (125g) finely ground polenta plus additional for preparing the pan
  • 2 cups (215g) almond flour
  • 6 tablespoons (55g) all-purpose flour
  • 1 1/2 teaspoons baking powder preferably aluminium-free
  • 1/2 teaspoon salt

For the glaze

  • 1 1/4 cups (170g) powdered sugar
  • 1 tablespoon orange juice
  • 4 teaspoons orange liqueur (such as Grand Marnier or Cointreau)

Instructions

  • Butter a 9-inch (23cm) loaf pan. Dust the inside with polenta, and tap out any excess. (Note: The pan I used has a nonstick finish. If you want to make sure the cake comes out nicely you may want to cut a rectangle of parchment paper and fit it into the bottom of the pan after you prepare it, especially if using an unfinished loaf pan.) Preheat the oven to 350ºF (180ºC).
  • In the bowl of a stand mixer fitted with the paddle attachment, beat the butter, sugar and lemon zest at medium-high speed, until it’s light and fluffy, about 3 minutes. (You can also make this in a large bowl, beating the butter and sugar by hand.)
  • Add the eggs one at a time, stopping the mixer after each addition to scrape down the sides of the bowl. Mix in the liqueur and almond extract.
  • In a medium bowl, whisk together the polenta, ground almonds, flour, baking powder, and salt, until there are no lumps. Gradually mix the dry ingredients into the creamed butter mixture, just until well-combined. Do not overmix.
  • Scrape the batter into the pan, smooth the top, and bake the cake until it is golden brown on top and a toothpick inserted into the center comes out almost clean, perhaps with just a few crumbs attached, 45 to 50 minutes. Let cool on a rack for about 30 minutes, then run a knife along the outside of the cake to loosen it from the pan and tip the cake onto the rack. Let the cake cool completely before icing.
  • To glaze the cake, mix the powdered sugar with the orange juice and orange liqueur until the glaze is thick, but still runny – not too watery, but as thick as a milkshake. If necessary, add a bit more sugar if it’s too thin, or add a bit more liquid if it’s too thick. You can try smoothing a bit over the cake to see if it’s the right consistency for drizzling and dripping down the sides before glazing the entire cake.
  • Spoon the glaze over the cake, encouraging the glaze to run down the sides by nudging it towards the edges with the back of the spoon or a metal spatula.

Notes

Serving: When the glaze has firmed up, serve slices of the cake with a favorite fruit compote, such as fresh citrus segments, caramelized pineapple, poached pears, or sliced and sugared peach slices (peeled) or nectarines.
Storage: The cake will keep for up to five days, if well wrapped, at room temperature. The cake will be noticeably moister the day after baking due to the oil in the nuts. It can be frozen for up to two months.

Related Recipes and Posts

Baking Ingredients and Substitutions

Cornbread with Harissa Butter

Polenta Crisp Topping

Simple Polenta

Cornmeal Cookies

Cornmeal Biscotti

crunchy brown butter baked carrots

By: deb
18 November 2025 at 23:34

My strongest opinion on Thanksgiving sides is that whenever possible, they should come in a casserole dish (or its chic French cousin, a gratin). I don’t mean that your sides should be limited to things that swim in cream, cheese, butter, or a happy combination of all three — although one dish in this category is highly welcome on my table — I simply mean that sides like this, that is baked in dishes with walls, tend to excel at holding up to resting times, reheat well, and stay warm longer.

Read more »

Cranberry Orange Cookie Bars (Vegan + Gluten-Free)

11 November 2025 at 10:00
Cranberry Orange Cookie Bars (Vegan + Gluten-Free)

The texture and flavor of a cookie with the ease of a bar? Talk about the perfect dessert! Introducing: cranberry orange cookie bars! 

These chewy, buttery cookie bars are packed with zesty orange flavor and pops of tart cranberries. Your new go-to treat awaits with just 1 bowl and 8 ingredients required! Did we mention they’re vegan and gluten-free? No one else has to know.

Cranberry Orange Cookie Bars (Vegan + Gluten-Free) from Minimalist Baker →

brown butter snickerdoodles

By: deb
21 October 2025 at 21:21

Friends, it’s snickerdoodle season. If you didn’t know that snickerdoodles had a season, let me paint a picture for you: you’re coming inside on a blustery and colder-than-you’d-expected October day so you hadn’t dressed for it and you can’t wait to announce what my kids always laugh at me for saying when I walk through the door: “Well, that’s enough doing things for me today!” and forswear things like “being outside” and “hard pants” for the rest of the evening but what is this! What is this god-like aroma of buttery baked cinnamon sugar warmth that has permeated your senses? Is it a scented candle, i.e. the idea, but not the substance of a thing you love? No, it’s snickerdoodles. And you’re about to eat a warm one, which feels like climbing inside It’s The Great Pumpkin, Charlie Brown while also, simultaneously, getting to be this dog. I’m not saying you cannot experience this sensory transcendency on a day in January or June, but it hits on a different, worldview-shifting, level when cold air is still a novel thing.

Read more »

Maple Pecan Sticky Buns

By: David
16 October 2025 at 14:16

Maple Pecan Sticky Buns

I’ve never been a huge fan of sticky buns because I find many of them teeth-screamingly sweet. That said, these dial down the sweetness in favor of flavor, courtesy of two of my favorite things: pecans and maple syrup. And having the two swaddled in a butterscotch-like caramel seems to make each one taste even better than they do on their own.

Maple Pecan Sticky Buns

I was intrigued by a new baking book, The New Sugar & Spice by Samantha Seneviratne, whose subtitle promises recipes for “bolder baking,” which immediately caught my interest. I don’t need to wow me with innovation – tweaking classics is often good enough. The wheel can only be reinvented so many times and no need to repair something that doesn’t need fixing.

Maple Pecan Sticky Buns

It’s unfortunate that I am hooked on both, and like other expats, maple syrup and pecans are two things that we tend to hoard. Sirop d’érable (maple syrup) is available in Paris, the best bottles are sold at natural food stores, and pecans are around, although I often find them not quite at their freshest by the time they’ve hit the store shelves. So I lug those back with me. Fortunately, on occasion, I’m treated to bags by visiting friends and guests. Thank goodness I now have an American-sized freezer.

Maple Pecan Sticky Buns

Well…to be honest, I used to hide them in the freezer, but since I’m a compulsive nibbler, I was getting tired of teething on frozen pecans. So I gave up and started keeping them in a drawer, which means easier access to these precious beauties.

Maple Pecan Sticky Buns

Sticky buns are very easy to make. You start with a simple yeasted dough, softened with milk. Once it rises, you strew the rolled out dough with a mixture of brown sugar and cinnamon. Then comes the fun part: Rolling them up!

The doughy roll then gets sliced into spiraled wheels. Watching them rise in the pan – then rise even further in the oven, is one of the great joys in life. Eating them, of course, is the best part. But if you’ve got kids (or even a middle-aged man, like me), this is a really fun project for a weekend or during a holiday break.

Maple Pecan Sticky Buns

While I was making these, I posted a live video on Snapchat, which is a fun way to share short videos that I’ve been playing around with. The downside is that I got so involved with shooting and sharing that I neglected to chop the pecans before using them, as you can see in the pictures. On Snapchat, posts and videos disappear after twenty-four hours – so when it’s gone, it’s gone! But you can follow me on Snapchat for other tips, future videos and a soupçon of occasional goofiness at davidlebovitz.

Maple Pecan Sticky Buns

As much as I’m freaked out by new technologies, the old ones tend to vex people, too. Folks get freaked out by candy thermometers, but if you use one, you can get your caramel precisely to where it should be. I “went rogue” and didn’t use one, and my sticky buns got a touch too dark, which I liked for the “on the edge” flavor, but resulted in a sticky bun glaze that was less-runny that what some might be used to. So if you have one, you should put that candy thermometer to use when making these sticky buns.

Maple Pecan Sticky Buns

The result of my morning of baking was a tray full of sticky buns that were great for a mid-morning snack but not bad for bringing to a meeting later that evening, which I did. The next day, people raved about them. I’ve got a few other “bold” recipes bookmarked from Samantha’s gorgeous book. And I’m going to make sure my stock of pecans doesn’t run too low, because I’ll be making these again in the near future.

Maple Pecan Sticky Buns

Print

Maple Pecan Sticky Buns

Adapted from The New Sugar & Spice by Samantha Seneviratne
The original recipe calls for baking eight spirals in a 9-inch (23cm) round pan, but I wanted to get nine smaller ones, so used an 8-inch (20cm) square pan and cut the rolled up dough into nine disks. You can do either. Note: Do not use a springform pan for this recipe. Because of the maple caramel, the pan may leak. Even if you wrap it well with foil, caramel may seep out and you don’t want the lovely maple-accented glaze on foil. You want it on your sticky buns.The original recipe also called for a mix of walnuts and pecans, and I opted for all pecans since they’re one of life’s great luxuries to me. But you can swap out any nuts as you wish. There was also 1/2 cup (80g) of raisins added to the caramel along with the pecans, which I omitted as well, although you’re welcome to add them, or another dried fruit, like cranberries or sour cherries.You’ll also note the recipe calls for bread flour. Its higher protein content means that you’ll have better gluten formation and sturdier bread, or buns, as in this case. Most well-stocked supermarkets carry it or you can buy it
. You can replicate it by replacing 1 1/2 teaspoons of all-purpose flour with 1 1/2 teaspoons of vital wheat gluten, per cup, or 140g, of all-purpose flour. (In France, I use T65 organic flour and add vital wheat gluten, which is available in natural food stores.)
Course Snack

Ingredients

For the dough

  • 6 tablespoons unsalted butter cubed
  • 2/3 cups (160ml) whole or lowfat milk
  • 3 tablespoons granulated sugar
  • 1 3/4 teaspoon active dry yeast
  • 1 large egg
  • 2 1/2 cups (320g) bread flour
  • 1/2 teaspoon kosher or sea salt

For the topping

  • 6 tablespoons (3 ounces, 85g) unsalted butter
  • 1/4 cup (45g) dark brown sugar
  • 1/4 cup (60ml) maple syrup (dark amber)
  • 1/2 teaspoon kosher or sea salt
  • 1 cup (140g) pecans lightly toasted and coarsely chopped

For the filling

  • 1/4 cup (45g) dark brown sugar
  • 2 tablespoons ground cinnamon
  • 1/2 teaspoon kosher or sea salt
  • 3 tablespoons (1 1/2 ounces, 42g) butter salted or unsalted, at room temperature

Instructions

  • To make the dough, warm the butter, milk and sugar in a small saucepan. Pour into the bowl of a stand mixer and let stand until slightly tepid. (You can make this without a stand mixer. If so, pour the milk mixture into a medium bowl.) Sprinkle the yeast over the milk, stir gently, and let sit in a warm place until it starts to bubble, about 10 to 15 minutes.
  • Mix in the egg, flour, and salt, and knead with the paddle or dough hook at low-to-medium speed until smooth and elastic, about 5 minutes. (If kneading by hand, it may take a bit longer.) Knead the dough a few times with your hand until it’s a smooth ball, place it back in the bowl and cover the bowl with a kitchen towel. Let rise in a warm place until doubled, about 1 to 1 ½ hours. Time can vary, and it may take longer, or less time.
  • While the dough is rising, make the topping. Lightly butter a 9-inch (23cm) round or 8-inch (20cm) square cake pan. Heat the butter, brown sugar, maple syrup and salt in a small saucepan fitted with a candy thermometer and cook over medium heat until the mixture comes to a boil. When it gets foamy, after a minute or so, when a few of the bubbles start to get larger, remove from heat. (Samantha notes in her book that if using a thermometer, the temperature should read 212ºF (100ºC).
  • Pour the maple caramel into the prepared cake pan and strew the pecans over the caramel. Set aside.
  • To make the filling, mix the brown sugar, cinnamon and salt in a small bowl. Set aside.
  • When the dough has risen, knead the dough a couple of times on a lightly floured countertop and roll it into a 10-inch (25cm) square. Spread the softened butter over the dough and sprinkle evenly with the filling mixture. Roll up the dough as tightly as possible and using a serrated knife, cut the dough into 8 or 9 slices. If using a square pan, cut into 9. If using a round pan, cut into 8. Place them in the pan with the cut side up. Cover loosely with plastic wrap or a clean, lint-free kitchen towel, and let rise until almost doubled, about 1 hour.
  • Ten minutes before you’re ready to bake the sticky buns, preheat the oven to 375ºF (190ºC). Place the pan of sticky buns on a baking sheet lined with foil (to catch any overflow drips or spill) and bake until the center roll is lightly browned on top and it doesn’t feel soft when you press it with your finger, 25 to 30 minutes.
  • Remove the rolls from the oven. Let cool for 5 minutes then run a knife around the outside (if possible, as the buns may have overtaken the rims), then tip the sticky buns out onto a cooling rack or serving platter.

Notes

Serving and storage: Sticky buns are always best served warm, and the day they are made but are fine the next day. If you wish, you can keep them well-wrapped for a few days, rewarming them in a low oven, wrapped in foil until heated through. They can be frozen for up to two months.

Related Posts

Ingredients for American Baking in Paris

Ingredient Ingredients and Substitutions

Vegan Sticky Buns (Minimalist Baker)

Gluten-Free Sticky Buns (Faithfully Gluten-Free)

Easy Gluten-Free Monster Cookies (Vegan, Flourless!)

14 October 2025 at 10:00
Easy Gluten-Free Monster Cookies (Vegan, Flourless!)

Monster Cookies have leveled up! Say hello to our healthier twist on the chewy, tender, peanut buttery, chocolate- & candy-studded cookie you know and love. Our version has all the decadence and deliciousness, but it’s vegan, gluten-free, flourless, oil-free, and maple-sweetened (magic, we know)!

Even better? These cookies are a breeze to make! You’ll need just 1 bowl, 9 ingredients, and about 20 minutes until it’s cookie time.

Easy Gluten-Free Monster Cookies (Vegan, Flourless!) from Minimalist Baker →

The BEST Gluten-Free Pumpkin Bread (1 Bowl!)

16 September 2025 at 10:00
The BEST Gluten-Free Pumpkin Bread (1 Bowl!)

Fall has three essentials: cozy sweaters, warming soups, and PUMPKIN BREAD! Whether your fond memories of this spice-filled treat are from Starbucks, Grandma’s house, or your favorite box mix, we’re bringing you alllll the nostalgia! This homemade gluten-free + dairy-free pumpkin bread is FLUFFY, tender, spice-filled, and has the perfect balance of sweetness and pumpkin flavor!

Just 1 bowl and simple ingredients required for this fall classic.

The BEST Gluten-Free Pumpkin Bread (1 Bowl!) from Minimalist Baker →

cucumber crunch salad with tofu

By: deb
25 June 2025 at 22:43

Is it too hot to cook? Does the thought of even turning on the microwave feel like it might tip you too close to the surface of the sun? We are long overdue to talk about my favorite heat wave meal, one I’ve been holding out on you for five too many summers. As the president of Overthinkers Anonymous, I had my reasons. What if you’re not as obsessed with inhaling a pound of fridge-cold cucumbers as I am? What if the mere whiff of peanut sesame noodle dressing doesn’t make you want to climb into a vat of it? What if my favorite salad tofu — firm silken — isn’t your favorite salad tofu? What if you don’t have a favorite salad tofu? [Six question marks in a paragraph might be a record!]

Read more »

Thai Peanut Dressing

8 May 2025 at 23:27
peanut dressing recipe

This peanut dressing is like peanut sauce, but in salad dressing form. It’s creamy, bold and nutty. It makes a statement! This dressing is awesome with Thai flavors like bell pepper, carrots, cabbage, mango and much more—you’ll find a list of suggestions below.

This salad dressing is easy to whisk together with basic ingredients. I bet you have them in your pantry already. You’ll need creamy peanut butter (the creamier, the better), lime juice, tamari or soy sauce, maple syrup or honey, fresh garlic and red pepper flakes (if you like some spice). That’s it!

Continue to the recipe...

The post Thai Peanut Dressing appeared first on Cookie and Kate.

Gluten-Free Lemon Poppy Seed Muffins (Vegan)

25 February 2025 at 10:00
Gluten-Free Lemon Poppy Seed Muffins (Vegan)

Friends, prepare to level up your muffin game with these undetectably vegan and gluten-free lemon poppy seed muffins! They’re perfectly sweet, tender, FLUFFY, and bursting with bright, lemony goodness. 

Made in just 1 bowl, they’re just as fun to make as they are to eat! Let’s get baking!

How to Make Vegan Gluten-Free Lemon Poppy Seed Muffins

These super FLUFFY muffins begin with using an electric mixer to cream together the vegan butter, cane sugar, and lemon zest.

Gluten-Free Lemon Poppy Seed Muffins (Vegan) from Minimalist Baker →

Salted Chocolate Chip Tahini Cookies

By: David
6 January 2025 at 15:48

Whenever I mention “Chocolate Chip Cookies,” this recipe seems to come up in the conversation. I’ve been making chocolate chip cookies all of my life, and am always happy to add new ones to my repertoire. I’ve made them with various kinds of flours, different types (and sizes) of chocolate, some with nuts (or cocoa nibs), and others without. In some cases, the salt in the chocolate chip cookies may be in the butter, or sprinkled on top. Or there might be a double-dose of chocolate in them.

But I haven’t done too much tinkering with the butter, because to me, that’s one thing that’s non-negotiable in chocolate chip cookies. But when I heard about tahini, my loyalty to butter was put into question.

You (and I) can relax, because these chocolate chip cookies do use butter, but get an underlying richness from sesame paste, a common ingredient in Middle Eastern cooking that I always keep on hand. So although I thought I’d done everything possible that a man could do to a chocolate chip cookie, and then some, I was finally ready to tackle a batch of these chocolate chip cookies.

The recipe is adapted from Modern Israeli Cooking by Danielle Oron, that also was in the New York Times. In addition to having everything on hand, they were easy to mix up, and the soft sesame paste made a dough that was hard not to snack on before the cookies went into the oven.

I prefer to chop chocolate for chocolate chip cookies, rather than use conventional chocolate chips. I have nothing against chocolate chips, but most are made of what’s called baking-resistant chocolate, which is designed to hold their shape once baked. I like big, oozing chunks of chocolate in my chocolate chip cookies, and I don’t care so much what they look like, so much as how they taste.

So I took a knife to a block of chocolate and made my own. Some makers are now producing what are called chocolate “chunks” which may or may not have similar qualities, but chopping a block of chocolate, while a bit messy, puts me in one of my happy places. And I’m happy to make my own chips, or chunks, I should say.

These cookies were some of the best chocolate chip cookies that have ever come out of my oven, and I don’t say that lightly. The tahini gives them a gentle savory taste, with a faint musky flavor that pairs remarkably well with dark chocolate and a touch of salt, so don’t be afraid to use a very strongly flavored chocolate. I futzed with the original recipe a little, to make them chewier, and couldn’t resist adding even more chocolate. But can you blame me?

Print

Salted Chocolate Chip Tahini Cookies

Adapted from Modern Israeli Cooking: 100 New Recipes for Traditional Classicsby Danielle Oron
I used chopped chocolate, rather than chocolate chips, for these cookies since I wanted large chunks of oozing chocolate rather than little bits of chocolate here and there. (But feel free to use chips if you'd like.) Normally when I chop chocolate for cookies, I add any small bits and pieces on the cutting board along with the bigger chunks. But for these, I wanted distinct, more assertive pieces of chocolate, so I sorted through and just used large chunks, saving the smaller bits for another baking project. I baked these cookies in a larger size, then tried them in smaller portions, and give baking times for each. Whichever size you bake them in, since everyone's oven is different, it's important to use visual clues rather than rely on precise minutes and numbers to tell when they're done. Keep an eye on them during the final minutes of baking; the cookies are done when quite pale in the center and browned around the edges. Note that the dough is best when it rests in the refrigerator overnight. You could bake them sooner, if you just can't wait.
Servings 18

Ingredients

  • 8 tablespoons (115g, 4 ounces) unsalted butter at room temperature
  • 1/2 cup (120ml) tahini well stirred
  • 1/2 cup (100g) granulated sugar
  • 1/2 cup (90g) packed light brown sugar
  • 1 large egg at room temperature
  • 1 large egg yolk
  • 1 teaspoon vanilla extract
  • 1 cup plus 2 tablespoons (150g) flour
  • 3/4 teaspoon baking soda
  • 1 teaspoon kosher or sea salt
  • 2 cups (280g) bittersweet or semisweet chocolate chunks or chocolate chips
  • flaky sea salt such as Maldon or fleur de sel

Instructions

  • In the bowl of a stand mixer, beat the butter, tahini, granulated sugar and brown sugar on medium speed for 2 to 3 minutes, until fluffy. (The dough can also be made in a large mixing bowl, stirred with a spatula.)
  • Stop the mixer and scrape down the sides. Add the egg, the yolk, and vanilla, and continue to mix for another minute, stopping the mixer to scrape down the sides of the bowl during mixing, to make sure the eggs are getting incorporated.
  • In a small bowl, whisk together the flour, baking soda, and kosher or sea salt. With the mixer on low speed, add the dry ingredients until just combined, then add the chocolate chips. Do not overmix. Cover the dough and refrigerate overnight.
  • Preheat the oven to 325ºF (160ºC). Line two baking sheets with parchment paper or silicone baking mats.
  • Form the cookies into rounds using an ice cream scoop, or your hands. For small cookies make each 1 1/2-inch (3,5cm), for larger cookies, make them 2-inches (5cm) round. Place them evenly spaced on the baking sheets, 3-inches (8cm) apart). Bake one sheet at a time, so you can keep an eye on them, in the middle rack of the oven.
  • Bake the cookies, turning the baking sheet in the oven midway during baking, until the cookies are golden brown around the edges but still pale in the center. For small cookies, about 12 minutes, for larger cookies, about 14 to 15 minutes. Remove from the oven, sprinkle cookies with a bit of flaky sea salt, and let the cookies cool on the baking sheet. Bake the remaining cookies the same way.

Notes

Storage: These cookies will keep for two or three days at room temperature, but are definitely better the same day they're baked. The unbaked dough can be refrigerated for up to one week, and frozen for up to two months.
Notes: Nut and seeds butters, such as peanut and almond, have different oil content than tahini, and I don't think they could be swapped out. (If you do try it with another nut or seed butter, let us know how they come out in the comments.) For those looking for a chocolate chip cookie without tahini, check out these Salted Butter Chocolate Chip Cookies or my recipe for Chocolate Chip Cookies in Ready for Dessert.


Related Posts and Recipes

Salted Chocolate Chip Cookies

Tahini and Almond Cookies

Baking Ingredients and Substitutions

How to Make Tahini

Ingredients for American Baking in Paris

Soom Tahini (Amazon)

Gluten-free baking and Substitutions

Chocolate Tahini Caramels (No Candy Thermometer!)

10 December 2024 at 10:00
Chocolate Tahini Caramels (No Candy Thermometer!)

If you love chocolate covered caramels, but not the complicated methods usually required to make them, then this recipe is for you! These EASY vegan sea salt caramels come together with just 6 ingredients and there’s NO candy thermometer in sight.

The secret? Tahini! It adds a decadent flavor to these bite-sized delights for the ultimate salty-sweet treat. Perfect for keeping in the freezer or gifting over the holidays…though we’re not sure how many of these tasty treats will make it to the gift box 😉.

Chocolate Tahini Caramels (No Candy Thermometer!) from Minimalist Baker →

Chocolate Pecan Shortbread Cookies (Vegan + GF)

3 December 2024 at 10:00
Chocolate Pecan Shortbread Cookies (Vegan + GF)

Say hello to crispy, buttery shortbread cookies studded with pecans and dark chocolate (swoon!). These cookies are our vegan and gluten-free twist on Alison Roman’s legendary Salted Chocolate Chunk Shortbread Cookies and (just like Alison’s), they’re too good to eat just one!

Just 7 ingredients and simple methods stand in your way. Grab your mixing bowl and let’s bake, friends!

Chocolate Pecan Shortbread Cookies (Vegan + GF) from Minimalist Baker →

1-Bowl Cranberry Orange Scones (Vegan + GF)

12 November 2024 at 10:00
1-Bowl Cranberry Orange Scones (Vegan + GF)

Cranberry + orange: a dynamic duo! This duo has made delicious muffins, crisp, and cranberry sauce, and now a new cranberry + orange favorite joins the Minimalist Baker family: scones! 

These EASY, 1-bowl scones are fluffy, citrusy, lightly sweetened, generously studded with fresh cranberries, and undetectably vegan + gluten-free. Perfect for holiday breakfasts, brunches, and beyond! Let us show you how it’s done!

These fluffy, tender, gluten-free scones get their perfect texture from a mix of almond flour, oat flour, and potato starch.

1-Bowl Cranberry Orange Scones (Vegan + GF) from Minimalist Baker →

Easy Gluten-Free Cornbread (1 Bowl!)

5 November 2024 at 10:00
Easy Gluten-Free Cornbread (1 Bowl!)

It’s no secret we love cornbread and have shared recipes for it before (exhibits A and B). And we wouldn’t be posting another version if it wasn’t worth it. So trust us…it’s worth it! This FLUFFY, moist gluten-free cornbread is naturally sweetened with honey, SO flavorful, and seriously EASY to make. 

Just 1 bowl and 8 ingredients stand between you and the best gluten-free cornbread.

Easy Gluten-Free Cornbread (1 Bowl!) from Minimalist Baker →

Fluffy Pumpkin Oat Cookies (1 Bowl!)

8 October 2024 at 10:00
Fluffy Pumpkin Oat Cookies (1 Bowl!)

Looking for a cookie filled with fall flavor? This is it! Fluffy, cinnamon-spiced, pecan-studded pumpkin oat cookies made in 1 bowl in 30 minutes

These vegan + gluten-free treats are easy, delicious, and extra irresistible when topped with pumpkin spice frosting. Preheat your oven…it’s cookie time!

These 1-BOWL fluffy fall dreams start with melted (vegan) butter, brown sugar, pumpkin purée, and vanilla extract.

Fluffy Pumpkin Oat Cookies (1 Bowl!) from Minimalist Baker →

Vegan Pumpkin Spice Buttercream Frosting

1 October 2024 at 10:00
Vegan Pumpkin Spice Buttercream Frosting

Frosting lovers, rejoice! We have the perfect pairing for your favorite pumpkin bread, cookies, spice cake, and more: Pumpkin spice buttercream frosting! It’s decadent, sweet, buttery (but vegan + dairy-free!), and perfectly pumpkin-spiced

This fluffy fall dream is just 1 bowl, 5 minutes, and 4 ingredients away. Grab your favorite pumpkin treat and let’s get to frosting!

Vegan Pumpkin Spice Buttercream Frosting from Minimalist Baker →

Apple Butter Snickerdoodle Cookies (Vegan + GF)

10 September 2024 at 10:00
Apple Butter Snickerdoodle Cookies (Vegan + GF)

Nothing says cozy season quite like apple butter and snickerdoodle cookies. But combined into ONE? These apple butter snickerdoodles are ultra COZY! They’re soft, fluffy, cinnamon-filled, packed with apple flavor, and dare we say they rival apple cider donuts!?

These fall-filled treats are vegan, gluten-free, and come together with just 10 ingredients. Preheat your oven and let’s bake some cookies!

How to Make Apple Butter Snickerdoodles

These cookies begin like any good fluffy cookie: with creaming (vegan) butter and sugar.

Apple Butter Snickerdoodle Cookies (Vegan + GF) from Minimalist Baker →

❌