 Login

skillet pierogi with mushrooms
21 October 2026 at 17:25


One of the first lessons I learned, right after I moved to Paris, was to never, ever be on time for a dinner party. When i got my first invitation to a dinner party, my hosts told me, “Come at 8pm…which in Paris, means to come at 8:20 or 8:30pm.”
Subsequently, when I have guests for dinner, I expect them to be at least 20 minutes late, although there’s much debate on how late you’re actually supposed to be. But if you’re on time, or early, your host likely won’t not be ready and you’ll probably catch them by surprise.
It’s a tricky balance when you’ve inviting people for dinner, since you want make sure when everyone’s at the table, dinner will be ready and perfectly cooked. If your friends show up very late, and you’ve made something like pork roast, which can take a while to bake, but will dry out if overcooked, you’re sunk.
So one technique I rely on is braising. Braising is cooking something long and slow, which softens cuts of meat and poultry, and infuses whatever you’re cooking with flavor. In the case of a tagine, a North African dish that benefits from braising, your cooking the meat in a broth of onions, aromatics, and spices, which all come together after a stint in the over to make a perfect one-pot meal, that’s can be kept warm in the oven until everyone is at the table.
In Paris, with so many Arabic and North African butchers around, it’s easy to find cuts of meat that lend themselves to slow-braising, and tagines are quite popular in France. When I wrote my book, My Paris Kitchen, someone wrote to me, wondering why I had non-French recipes in my book. Just like people in other countries, such as Americans who make Mexican and Asian foods at home, or Dutch people who eat rijsttafel, an Indonesian meal composed of many side dishes, French people regularly eat a variety of foods from other cultures, especially in Paris, which is a melting pot, where you can enjoy couscous in Belleville, dosas in the Indian quarter, and Vietnamese noodles in the thirteenth arrondissement. But really, you can get all those foods in just about every corner of the city.
Tagines are simple to make, and once you’ve made one, you’ll wonder what took you so long to make one? You’re basically just browning the meat in a Dutch oven or large pot, then sautéing an onion with spices and seasonings, adding a few spoonfuls of tomato paste or a can of tomatoes, some stock or water, then braising it in the over for a few hours.
This is my basic recipe that I make often. It works great with a lamb shoulder, which you can have your butcher cut into pieces for you. If you can only get a whole lamb shoulder, you can skip the sautéing step and just braise the lamb shoulder whole. If you can get lamb shanks, this recipe works well with four of them.
I like to serve it with pearl couscous, which you can see above. It’s basically pasta pearls, and goes by several different names. Regular couscous is also an option, as is rice-shaped pasta, known as orzo
There comes a point in the life of many soups when they get a little sleepy.
This happens especially often with soups that are creamy, starchy or — blessedly — both. Everything is humming along just fine. The onions are soft. The garlic is fragrant. The spices have bloomed. You taste a spoonful and think, Hmm. So you add another pinch of seasoning. You taste again. Still: Hmm.
At this point, most of us instinctively reach for the salt.
But I’d like to gently intercept your hand on the way there and redirect it toward wherever you keep your vinegar. Some swear by the pantry, others insist upon the refrigerator; we will not allow ourselves to be distracted from our soup scholarship by these sectarian squabbles (at least not this week).
Because sometimes your soup doesn’t need more salt. It needs acid.
A small splash of vinegar at the end of cooking can give a tired pot an almost startling jolt. Vegetables taste brighter. Herbs seem greener. Starchy soups feel less pasty on the tongue. Spices that had faded into the background suddenly become legible again. Depending on how much you add, you might even get a delectable little Oh, what is that? pucker at the end of each bite.
I love lemon in soup, too. Sometimes I want the lemon flavor to be the whole point: a lemony avgolemono, for instance, or a chicken stew that tastes unabashedly citrusy. But lemon can announce itself loudly. Same with lime.
Vinegar can be more like a gentle wake-up than a glass of water to the face.
I first really understood this while making Alison Roman’s dill-packed potato-leek soup, published originally a little over five years ago, which finishes with white wine vinegar. Roman writes that the vinegar makes the soup taste “almost like a pickle.” I went into the recipe expecting exactly that, was delighted to find it delivered and started experimenting with the same trick in soups of my own.
The key here is finishing with vinegar. There are, of course, soups where acidity is built in earlier: Chinese hot-and-sour soups, borscht and various Eastern European sour soups all have their own traditions and techniques. But that’s a different lesson.
For our purposes, cook your soup until it’s essentially done. Then, before making the final salt adjustment, add about 1/2 teaspoon to 1 teaspoon of vinegar. Stir it in thoroughly and give it a moment. I actually like to step away from the stove at this point. Get some water. Wash a spoon. Pop my head out the kitchen window like a dog on a road trip. Then come back and taste again.
Vinegar is firmly in the category of ingredients that are easier to add than subtract. You’re not necessarily trying to make the soup taste vinegary. You’re waiting for everything else in the pot to suddenly taste more like itself.
Want more great food writing and recipes? Sign up for Salon’s free food newsletter, The Bite.
Different vinegars naturally play better with different soups. Red wine vinegar is wonderful with hearty lentil, bean and farro soups, and I love it in beef stew. It can also rescue a tomato soup that’s drifted too far toward sweetness.
White wine vinegar — or even plain distilled white vinegar — is excellent with potatoes, creamy chicken soups and corn chowders. Think of the logic of salt-and-vinegar potato chips: starch loves that sharp little counterpoint.
For sweeter, earthier soups made with squash or root vegetables, I tend toward vinegars with a little fruitiness of their own, like apple cider vinegar or my current favorite, white balsamic.
There are exceptions. I probably wouldn’t start splashing vinegar into a delicate seafood bisque. And broccoli-cheddar soup, for me, remains a no-fly zone. Not every pot requires intervention.
But many do.
I learned to cook thinking that “finishing” a dish meant adding enough salt and pepper. Then fresh herbs were a revelation. Acid was another one: a reminder that a finished dish doesn’t necessarily need more flavor so much as it sometimes needs contrast.
We need your help to stay independent.
That’s especially true of this week’s soup: a hot honey carrot and sweet potato number built with garlic, onion, coriander, paprika, cumin, red pepper flakes and miso, then rounded out with savory stock and coconut milk.
Before the vinegar, it tasted good — but a little too sweet and a little too earthy. The white balsamic changed the geometry of the whole bowl. The sweetness of the vegetables became more nuanced instead of landing like a sledgehammer. The spices emerged. The stock tasted more savory. And instead of registering immediately, the hot honey left a gentle warmth at the back of each bite.
So that’s your homework for week two of Soup School: When your next pot tastes fine but somehow unfinished, don’t automatically add another shower of salt.
Add a little vinegar.
Let it sink in.
Then taste again.
Building on last week’s lesson, this soup starts in the oven, where carrots, sweet potatoes, scallions, miso, hot honey and a deliberately assertive amount of spice get deeply caramelized before ever meeting the stockpot. Coconut milk softens the edges.
Then, incorporating this week’s lesson, white balsamic or apple cider vinegar keeps the root vegetables’ sweetness from becoming cloying.
A note on the spices: There are a lot of them. That’s intentional. Sweet potatoes and carrots can take it, and the coconut milk mellows everything considerably. If you’re particularly sensitive to heat, though, feel free to scale back the red pepper flakes and hot honey.
Ingredients
2 medium carrots, roughly chopped
1 cup diced sweet potato, fresh or frozen
2 tablespoons sliced scallion greens, plus more for serving
1 tablespoon olive oil
3 teaspoons garlic powder
3 teaspoons onion powder
3 teaspoons ground coriander
3 teaspoons smoked paprika
3 teaspoons ground cumin
3 teaspoons red pepper flakes, or less to taste
1 tablespoon white miso paste
3 teaspoons hot honey, plus more to taste if desired
1 cup chicken or vegetable stock, divided
1 cup full-fat canned coconut milk
White balsamic vinegar or apple cider vinegar, as needed
Kosher salt, to taste
Coconut cream, for serving
Crusty bread, for serving
Directions
This story originally appeared in “The Bite,” my weekly food newsletter for Salon. If you enjoyed it and would like more essays, recipes, technique explainers and interviews sent straight to your inbox, subscribe here.
Read more
from “The Bite”
The post Your soup needs a little vinegar appeared first on Salon.com.
For a while, I kept a soup journal.
Not a recipe journal, exactly. More like field notes. If I ate a soup I liked out in the world, I’d jot down what was in it, what the broth tasted like, sometimes sketch the bowl. I just adore the form.
Especially when I lived alone, it was not unheard of for all three meals in a day to be soup. One particularly triumphant day started with congee in Washington, D.C., continued with enchilada soup at an airport Chili’s and ended with pastina back home in my pajamas.
So, in honor of soup season, I’ve decided to spend the next few weeks of “The Bite,” Salon’s food newsletter, teaching what I’ve started referring to in my notebook at Soup School: a loose little series about the patterns that make soup better. We’ll talk about the ingredient your soup is probably missing — vinegar! — plus better soup toppers and, eventually, how to host a soup party.
But lesson one is the foundation for a lot of the soups I make at home: Start in the oven.
I don’t mean every soup. Some soups depend on freshness, delicacy or a particularly clean broth, and I’ll get to those. But when I want depth, sweetness, browning and the kind of flavor that tastes like something has been cooking much longer than it actually has, I start by roasting.
Here’s the method.
Tomato soup was the one that made this click for me.
Mine started with garlic, red onion, sun-dried tomatoes, cherry tomatoes, fennel, olive oil, spices and an anchovy or two, all piled into a Dutch oven and roasted together.
The oven transformed every ingredient differently. The onion and fennel softened, browned and grew sweeter. The anchovy sizzled itself into the oil coating those browned alliums. The cherry tomatoes burst, their skins turning silky and their juices almost pasty around the edges. The sun-dried tomatoes somehow became even more concentrated. The spices perfumed absolutely everything.
By the time the pot came out of the oven, most of the flavor was already there.
That, to me, is the whole appeal of the method. You can build a similar kind of depth on the stovetop, of course, but the oven does a lot of the work for you. Dry heat browns, evaporates and concentrates while you go do something else.
And when you roast, push things a little farther than may initially feel instinctive.
Your vegetables should not be pretty anymore. I want onions slumped and browned at the edges. Tomatoes wrinkled and burst. Mushrooms dark. Carrots blistered. Bits sticking to the bottom of the pot. If everything still looks ready for a glossy farmers market photo shoot, give it another few minutes. This works beautifully with fresh vegetables, but frozen vegetables are welcome, too. So are drained canned beans.
Douse whatever you have in oil, season it well and let it get ugly.
We need your help to stay independent.
This is also when I deploy what I lovingly think of as my potions and powders: anchovy, tomato paste, miso, soy sauce, fish sauce, bouillon paste or cubes, mushroom and brown gravy powder.
Not all at once, obviously, though I respect the chaos.
The point is to let those deeply savory ingredients spend some time in the heat rather than simply dissolving them into broth at the end. Tomato paste darkens. Anchovy melts into the oil. Spices bloom. Everything has a chance to mingle before the soup gets diluted.
Once everything is properly roasted, I add just enough broth to loosen the browned, sticky bits from the bottom of the pot. Not a carton. Not even close. At this point, the broth isn’t there to create the flavor. It’s there to capture what the oven already made.
Scrape thoroughly. Those dark little bits on the bottom are part of the soup now.
For a lot of vegetable, bean and chowder-style soups, I blend about half of what’s in the pot.That gives you body without turning the whole thing into purée. The blended vegetables thicken the broth, while the rest keep enough texture to remind you what you’re eating.
You can do this in a blender or with an immersion blender (though I tend to like the control of scooping part of the mixture into a blender and leaving the rest alone.)
Here is the part that feels a little counterintuitive: after going to the trouble of deglazing the pot, I often cook everything back down again. I let the blended and unblended mixture simmer until it gets thick, concentrated and almost sticky. Then I add my final stock, cream or coconut cream until the soup reaches the consistency I actually want.
This is one of my strongest soup opinions: don’t drown the thing you just concentrated.
You can always add more broth. You cannot easily take it back out (though, if you do, it’s not the end of the world: just let the soup reduce longer.)
Add a little. Stir. Taste. Add more if you need it.
Want more great food writing and recipes? Sign up for Salon’s free food newsletter, The Bite.
Once the texture is right, I finish with whatever gives the soup its final bit of life: herbs, citrus zest, salt, black pepper, maybe cream. Those ingredients don’t need half an hour in the oven. They need to stay bright.
Once I noticed this pattern, I realized it’s how I make most of my favorite soups: tomato soup, corn chowders, vegetable soups, bean soups and even chicken soup.
For chicken soup, I roast thighs on a bed of onion, garlic, carrot and celery with big lemon slices, garlic powder, onion powder and plenty of black pepper. Once the chicken is cooked, I pull it out to shred later, while the vegetables underneath — softened in chicken fat, lemon and all those browned juices — become the base of the soup.
I am certainly not claiming to have invented roasted chicken soup. Italian penicillin nonnas have been several centuries ahead of me on that front. But the example stands.
Roast first. Deglaze. Blend some. Reduce. Reconstitute. Finish.
There are plenty of soups I would never subject to this treatment.
If I want something fresh, delicate or particularly clean-tasting, I stay on the stovetop. A clear miso broth with beautiful soft cubes of tofu doesn’t need caramelization. Neither does a simple cream of potato or parsnip soup (more on those next week!), or a bright, stewy pozole verde.
My spring pea soup — peas, stock, cream, dill, black pepper and lemon zest — absolutely does not belong in the oven. She is delicate. Leave her alone.
But if the goal is depth, browning and concentration, this is the pattern I come back to over and over.
Take the vegetables you have. Fresh or frozen. Add some canned beans if you’ve got them. Douse the whole situation in oil and spices and roast until things get a little ugly. Deglaze. Blend some of it. Reduce it. Add broth carefully. Finish it with whatever makes sense.
It is not a precise science. It is not particularly pretty.
It is, however, delicious.
This is a current variation on roasted tomato soup I’ve been making a lot recently: warmly spiced with garam masala, fennel and coriander, rounded out with miso and coconut cream. Garam masala is an Indian spice blend whose exact makeup varies, but it commonly includes warming spices like cumin, cardamom, cinnamon, cloves and black pepper.
Ingredients
2 large beefsteak tomatoes, roughly chopped
1 medium white onion, roughly chopped
4 to 5 garlic cloves
1 tablespoon minced fresh ginger
3 tablespoons olive oil
1 tablespoon white miso
1 tablespoon tomato paste
1½ teaspoons garam masala
1 teaspoon fennel seeds
1 teaspoon ground coriander, or lightly crushed coriander seeds
½ to ¾ cup chicken stock, for deglazing, plus about 1 cup more to finish
⅔ cup coconut cream, plus more for serving
Kosher salt and freshly ground black pepper, to taste
Sliced scallions, for serving
Fresh cilantro, for serving
Toasted bread, for serving
Directions
This story originally appeared in The Bite, my weekly food newsletter for Salon. If you enjoyed it and would like more essays, recipes, technique explainers and interviews sent straight to your inbox, subscribe here.
Read more
from “The Bite”
The post For better soups, start in the oven appeared first on Salon.com.
This may or may not happen to you, but sometimes when I’m a guest in someone’s home, where everyone pitches in to make dinner, all eyes (or just the host’s eyes) fall on me to make dessert. Gulp. I happy to pitch in with the cooking or bringing along a few baked goodies for the weekend, but I’m not always prepared to bake on the spot.
If you’re lucky, there may be a scale, a cake pan, a sharp knife, and hopefully sugar, butter, eggs, and flour. If you’re really lucky, there might be a whisk and a spatula, too. But if you’ve ever tried to peel a dozen apples with a steak knife because it’s the only one that’s even close to sharp, or eyeball 1 cup/140g) of flour, you know what I’m talking about. I once did a post on Things I Bring When I’m a Guest for the Weekend, which raised the ire of some, but I require a minimum of a knife, a spatula, a bowl, and a cake pan if I’m going to bake something, like a cake.
You’re likely familiar with the Moelleux au chocolat, the soft warm individual melting cakes that everybody loves. (If you have the kind of friends that have six to eight ramekins, well, that’s great.) I recently saw French food writer and journalist François-Régis Gaudy (his book, Let’s Eat France, translated into English, is a lot of fun and pretty amazing) make a Moelleux à la abricot on his Instagram page, which didn’t require a mixer or any special equipment. Not even a whisk!
His Apricot Cake was a very casual affair, baked in a rectangular mold on a sheet of parchment paper, and came out of the oven rather free-form, looking exactly like something that would come out of a French home cook’s kitchen, when baking dessert for friends. I’m fine with that but didn’t know if you were, so I thought I’d tinker with it and make it in a cake pan, which is easier to slice. I also fiddled around with the ingredients, as well as putting the brown granulated sugar on top (rather than underneath), to give the moelleux a nice sheen.
I used a springform cake pan but you can use any similar-sized vessel; an 8-, 9- or 10-square or round cake pan would work, or even a baking dish. The baking time will vary but if your experience with using a variety of ovens in other people’s homes is anything like mine, you’ll find that each one is different, and what one says is 350ºF/180ºC will be different than another whose dial says 350ºF/180ºC. I don’t travel with an oven thermometer but may add that to things I bring when I’m staying with people.
Tip: If you’re staying in someone’s place for the weekend, you can mix the dry ingredients in a container or zip-top bag then put the dessert together when you get there.
I made one cake with apricots first, which was sensational, but knowing fresh apricots are harder to come by elsewhere, I made another one with plums, which came out great as well. It would work with other summer fruits and berries but I really like the tanginess of apricots or plums against the moist cake layer, so stuck with those two. A handful of berries wouldn’t hurt either, but I do recommend keeping it simple.
One of the first “recipes” on this blog was No-Recipe Cherry Jam, posted in 2005, which wasn’t quite a recipe. Nevertheless, a lot of people successfully used those guidelines to make cherry jam over the last fifteen years. The basis for it was how I’ve been making jam forever, using 3 parts sugar to 4 parts fruit puree. The standard ratio is to use equal parts sugar to fruit puree but I like to use less.
I often make cherry jam with sweet cherries, which are what one usually finds at the market. But if you can find sour cherries, those are wonderful in the mix, but when fresh, they have a short shelf life so should be used, pronto.
So feel free to mix things up, cherry-wise!
Unlike other recipes, making jam can require a bit of using your instincts, rather than relying on set times and temperatures. Checking the jam texture on a chilled plate is the best way to tell you when it’s done. (As an example, jam usually sets between 218-220ºF,103-104ºC, but this one set a few degrees higher.) Because cherries are low in pectin, this one often “sets” a few degrees higher, although don’t expect cherry jam to be as stiff as other jams that you might be used to, or buy. It’ll be a bit runny, which is just how it should be.
One tool I do recommend is a cherry pitter. Not everyone has one, and they do fall into the “single use” category, but come cherry season, mine gets a good workout. I wrote more about why you should get a cherry pitter here.
The biggest question I get about jam recipes is people asking about reducing the amount of sugar in them. Sugar in jam does a couple of things. One, it helps the mixture jell, along with any natural pectin in the fruit. And two, it preserves it. If you use less, the jam will be runnier and won’t last as long.
Europeans tend to like their jams runnier than their American counterparts, so in the morning, you can have a European experience when you spoon some of this jam on your morning toast, as we do.
Unlike other jams that wrinkle when you do the wrinkle test (putting a spoonful of jam on a frozen plate, returning the plate to the freezer and when the jam wrinkles with you nudge it, it’s done), this one will be more like thickened syrup. It’s done when it’s thick and sticky and holds its shape for a few moments after you drag a spoon through it (below.) The cherries will be shiny and glossy, like beautiful ruby-colored jewels.
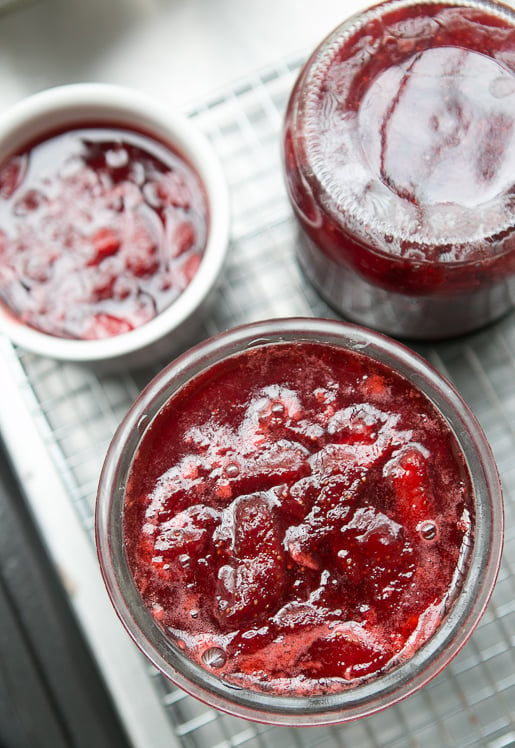
I was recently gifted an overload of strawberries: I bought four baskets from a vendor at the market, whose booth I shop at often, and he threw in two extra baskets for free, the equivalent of a carte de fidelité (loyalty card) in Paris. So I’ve spent the past few days washing, hulling, cutting and cooking my unexpected bounty.
I’ve been making a number of things with the gorgeous strawberries. But I also realized that while I have a Strawberry-Rhubarb Jam recipe on the site, I didn’t have a strawberry jam. So here it is.
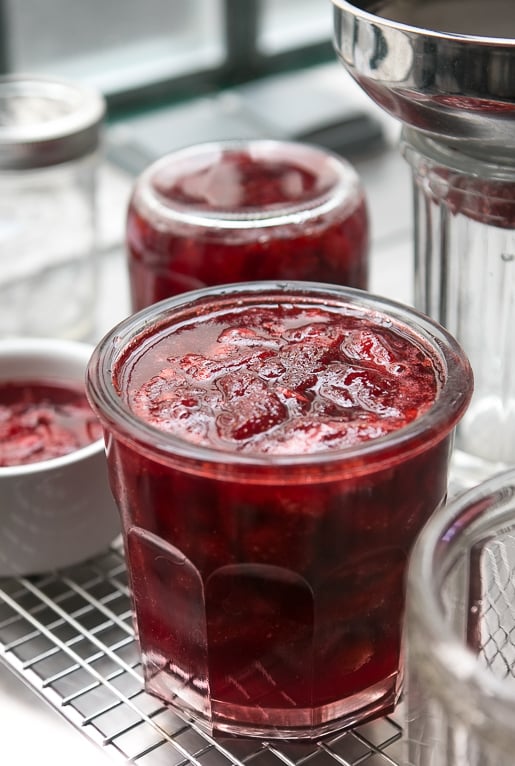
Although I’m giving you a recipe for the amount of strawberries that I used, you can use the same proportions if you have just a basket…or a bushel. You’ll just need to do a slight amount of math. Only the cooking time will change, so keep an eye on things.
Jam-making is not something you walk away from and you need to rely more on look and feel, rather than exact times. Another thing about jam-making is that fruit and berry jams are always better made in small batches; the shorter the cooking time, the better the flavor. So if you have more than 2-pounds (900g) of strawberries, consider making jam in a couple of batches rather than one big one.
Related Recipes and Links
